In a world where space often feels limited, the need for effective storage solutions has never been more pertinent. Whether you're living in a small apartment, a bustling home filled with family, or a workshop that's overflowing with tools, the right storage can make a significant difference in your environment. This article explores various DIY projects focused on building storage solutions that not only help you declutter but also add a touch of personalization and creativity to your space. We will cover everything from simple shelving units to more complex furniture designs, ensuring that you have the necessary resources and inspiration to tackle your next project.
Understanding the Need for Storage Solutions
Before diving into specific projects, it's essential to understand why effective storage is crucial. Clutter can lead to stress and inefficiency in our daily lives. Having a dedicated place for everything can enhance productivity, improve organization, and elevate the overall aesthetic of your living or working space.
Moreover, with the rise of minimalism and sustainable living, creating your own storage solutions can be an environmentally friendly choice. Instead of purchasing mass-produced furniture, DIY projects allow you to repurpose materials, reduce waste, and customize your storage to fit your specific needs.
Essential Tools and Materials for DIY Storage Projects
Before embarking on any DIY project, it's vital to equip yourself with the right tools and materials. Here's a list of essentials you should have:
- Tools: Circular saw, drill, level, measuring tape, hammer, screwdriver, and clamps.
- Materials: Plywood, wood screws, brackets, paint or wood stain, and finishing materials.
Having these tools and materials on hand will not only make your projects easier but also ensure that you can tackle a variety of storage solutions without frequent trips to the hardware store.
Top DIY Storage Projects
Let's delve into some practical and creative DIY storage projects that you can easily accomplish. Each project is designed to be user-friendly, catering to various skill levels from beginners to more experienced DIY enthusiasts.
1. Floating Shelves
Floating shelves are a fantastic way to add storage without sacrificing floor space. They can be used in any room, from the living room to the kitchen.
Materials Needed:
- Wood boards (your choice of size and type)
- Brackets (if not using hidden mounting systems)
- Wood screws
- Wall anchors (if mounting on drywall)
- Sandpaper and finish (stain or paint)
Steps to Build:
- Measure and mark where you want your shelves to go.
- Cut the wood to your desired length.
- Sand the edges and surfaces for a smooth finish.
- Attach brackets or mounting systems to the wall.
- Secure the shelves and check for level.
- Finish with paint or stain as desired.
2. Under-Bed Storage Drawers
Utilizing the often-overlooked space under your bed can significantly increase your storage capacity. These drawers are perfect for storing out-of-season clothing, shoes, or extra bedding.
Materials Needed:
- Wood boards for drawer frames
- Wood for drawer sides and bottoms
- Drawer slides
- Paint or finish
Steps to Build:
- Measure the space under your bed to determine the dimensions of your drawers.
- Cut the wood to size for the frame and sides.
- Assemble the frame and attach the sides.
- Install drawer slides for smooth operation.
- Finish with paint or stain.
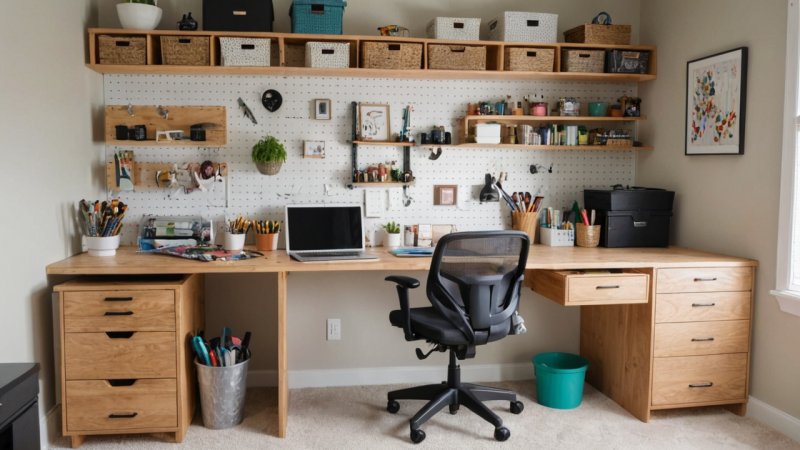
3. Pegboard Tool Organizer
If you have a garage or workshop, a pegboard tool organizer can help keep your tools easily accessible and organized.
Materials Needed:
- Pegboard
- Plywood for backing
- Pegs and hooks
- Wood screws
Steps to Build:
- Cut the plywood to size for backing and attach to the wall.
- Mount the pegboard on top of the plywood using screws.
- Add pegs and hooks for your tools.
- Organize your tools in a way that maximizes efficiency.
4. Customized Closet Organizer
Transforming your closet into an organized storage space can save you time and hassle. A custom closet organizer can be built to fit your specific needs.
Materials Needed:
- Wood boards for shelves
- Wood screws
- Brackets or shelving supports
- Paint or finish
Steps to Build:
- Empty your closet and measure the space.
- Determine the layout and height of your shelves.
- Cut the wood to size and install brackets or supports.
- Secure shelves in place and finish as desired.
Tips for Effective DIY Storage Solutions
Creating effective storage solutions is as much about planning as it is about building. Here are some tips to enhance your DIY projects:
- Plan Ahead: Before starting, sketch your ideas and take measurements to avoid mistakes.
- Use Quality Materials: Invest in good quality wood and hardware to ensure durability.
- Consider Functionality: Think about how you will use the storage and design accordingly.
- Involve Others: If this is a family project, involve others to make it a fun and collaborative experience.
Conclusion
Building your own storage solutions can be a rewarding endeavor that not only improves organization but also adds a personal touch to your space. From floating shelves to customized closet organizers, the possibilities are endless. By following the guidelines and tips outlined in this article, you can create effective, personalized storage solutions that cater to your specific needs. Embrace your creativity, gather your tools, and get started on making your living or working environment more organized and functional.