Removing wallpaper can often feel like a daunting task, but with the right tools and techniques, it can become a straightforward project. One of the most essential tools for wallpaper removal is the wallpaper scraper. This article delves into the best practices for using a wallpaper scraper effectively, ensuring you can tackle this job with confidence. We’ll cover the types of wallpaper scrapers available, techniques for optimal use, safety tips, and how to prepare your walls afterward for a fresh coat of paint or new wallpaper.
Understanding Wallpaper Scrapers
Before diving into the tips, it’s important to understand what a wallpaper scraper is and the different types available on the market. A wallpaper scraper is typically a flat, sharp-edged tool designed for removing wallpaper from walls. There are various types of scrapers, including:
- Plastic Scrapers: Lightweight and less likely to damage drywall, plastic scrapers are great for delicate wallpaper.
- Metal Scrapers: These are more robust and can tackle tougher wallpaper but may damage the wall surface if used carelessly.
- Multi-Edge Scrapers: Equipped with different edges for various removal tasks, these tools provide versatility.
Preparing for the Job
Before you start scraping, proper preparation is key to ensuring a smooth process. Here are some steps to take:
1. Gather Your Tools
Along with a wallpaper scraper, make sure you have the following tools and materials:
- Drop cloths to protect your floors
- Putty knife for lifting edges
- Spray bottle with water or a wallpaper removal solution
- Bucket for collecting scraps
- Gloves and safety goggles for protection
2. Prepare the Room
Clear the room of furniture and cover the floors to prevent damage. Removing decor and light switch covers will help you get to the edges of the wallpaper more easily.
3. Test a Small Area
Before going all in, it’s wise to test a small section of the wallpaper to determine how easily it comes off and whether it will require additional wetting or a specific solvent.
Effective Scraping Techniques
Now that you’re prepared, it’s time to dive into the actual scraping process. Here are some effective techniques to consider:
1. Wet the Wallpaper
Using a spray bottle, apply water or a wallpaper removal solution to the wallpaper. Allow it to soak for a few minutes; this helps to loosen the adhesive, making it easier to remove.
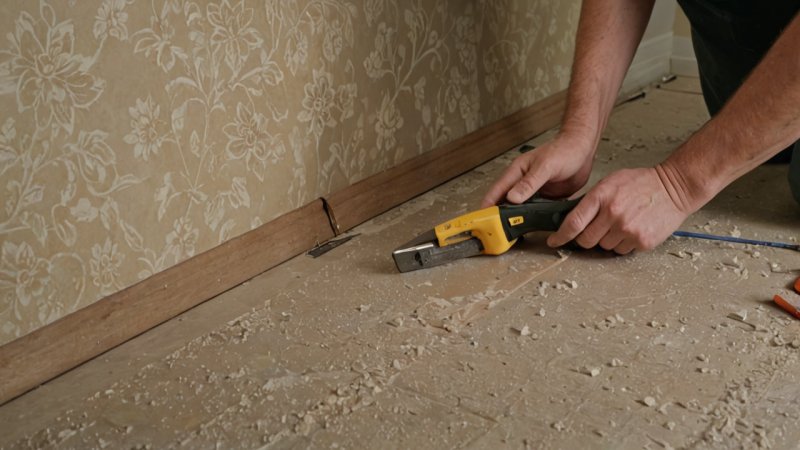
2. Start at the Edges
Using a putty knife, gently lift the edge of the wallpaper. Once you have a small flap, you can use the scraper to get under it and start pulling it off. Always scrape away from yourself to maintain control.
3. Use a Steady Hand
As you scrape, keep the scraper at a shallow angle to the wall. This helps to avoid gouging the wall surface and ensures you’re effectively removing the wallpaper without damaging the underlying drywall.
4. Work in Sections
It’s usually best to work in small sections rather than trying to remove large pieces all at once. This allows you to focus on ensuring each area is cleaned properly before moving on.
Dealing with Stubborn Wallpaper
Sometimes, despite your best efforts, certain wallpapers can be particularly stubborn. Here are some tips for dealing with these situations:
1. Use Steam
A steam wallpaper remover can be a game-changer for tough wallpaper. The steam penetrates the wallpaper and adhesive, making it much easier to peel off.
2. Scrape in Different Directions
If the wallpaper isn’t coming off easily, try scraping from different angles. This may help to loosen the adhesive more effectively.
3. Apply More Solution
If you find that the wallpaper is still resistant, don’t hesitate to apply more water or solution. Sometimes, wallpaper can take longer to loosen than anticipated.
Post-Removal Steps
Once you’ve successfully removed the wallpaper, it’s crucial to prepare your walls for their next phase, whether that’s new wallpaper or paint. Here are some important steps:
1. Clean the Walls
Use soapy water to clean off any residue left from the wallpaper adhesive. A clean surface is essential for a good paint job or new wallpaper application.
2. Repair Damage
Inspect the walls for any damage caused during the scraping process. Use spackle to fill any holes or dents, and sand the area smooth once it’s dry.
3. Prime the Walls
Applying a primer is a good idea, especially if you’re going to paint. Primer will help the paint adhere better and can help cover any imperfections.
Safety Tips While Using a Wallpaper Scraper
Safety should always be a priority when using any tools. Here are some tips to keep in mind:
- Always wear safety goggles to protect your eyes from debris.
- Use gloves to protect your hands, especially if working with sharp scrapers.
- Ensure your work area is well-lit to avoid accidents.
- Be mindful of your posture and grip; maintain control of the scraper to prevent slips.
Final Thoughts
Using a wallpaper scraper effectively requires a combination of the right tools, techniques, and safety measures. By understanding the types of scrapers available, preparing your workspace, and employing proven scraping methods, you can tackle wallpaper removal with confidence. Remember to take your time, work in small sections, and be prepared to deal with stubborn wallpaper as needed. With these tips, you’ll be well on your way to achieving a clean slate for your next home improvement project.